Wednesday, 12 August 2015
Friday, 17 April 2015
Survey
If i was to do my report again for my Introductory Professional Studies unit at CCAD hartlepool for BA (hons) production design for stage and screen, This would be the survey i would post out to Makeup artists in the UK. I didn't think about doing a survey for my report until last minute, so i got no responses as i sent it out 4 days before the deadline.
Surveys give a more valid and bigger response to questions for reports and create a more valid argument. They also show a range of results which can be discussed to make a report more interesting.
working freelance
I decided to do this post as freelance is the route I quite want to go down. This is just a very quick post on this topic.
Freelance is basically working for yourself and getting commissioned to do work for people. This route can be quite hard but is appealing as you are your own boss and get hired by others to do work for them. Freelance work can start off slow with some jobs paying little or nothing but once you get recognised and get a foot in the door as they say, some jobs might be quite well paid and lead onto bigger things. The downside with freelance is that the money you bring in can differ and depends on the jobs you are tasked with.
The links below are some articles I found on a day in the life of a freelance makeup artist:
http://www.theguardian.com/money/2012/jun/22/working-life-make-up-artist
http://www.adventuresofacarryon.com/2013/02/07/a-day-in-the-life-of-a-freelance-makeup-artist/
finding work while free lancing:
Promoting is the biggest way to get work as a freelance makeup artist. Having a website, or making accounts on things like twitter, Facebook and YouTube allow you to put contact details and promote your work to a wide range of different people. This may lead to opportunities in work as someone may stumble across your work and you may be exactly what they are looking for.
Another thing is to keep looking on sites that advertise creative jobs, like stagejobspro.com. This website lists a whole host of different jobs in theatres, and sometimes it has makeup jobs. There are a lot more websites such as starnow.co.uk, and even job sites like indeed may have something advertised in this sector.
Thursday, 16 April 2015
The process of creating prosthetics
I have started looking into the process of making prosthetic appliances. This is a quick post showing the different steps in making prosthetics.
These are some links I have found useful while learning how to make prosthetics:
http://www.ps-composites.com/blog/HOW-TO-MAKE-PROSTHETICS/
Any of the videos of the next link are amazing at teaching you how to make these appliances:
https://www.youtube.com/results?search_query=how+to+make+prosthetics
Any of the videos of this next link are amazing at showing you how to sculpt different textures and shapes for prosthetics:
https://www.youtube.com/results?search_query=how+to+sculpt+a+prosthetic
Any of the videos on the next link are amazing at showing you how to life cast:
https://www.youtube.com/results?search_query=how+to+life+cast
I find videos easier to understand and learn from than articles and written instructions so that's why I have put links to so many videos.
Life casting:
Life casting involves casting someone's body part depending on where you want the prosthetic to be, this makes a base onto which you can sculpt the prosthetic piece onto. You can life cast with alginate, Although there are other casting materials available. For my recent face cast I used Modroc (plaster bandage), as this method is cheaper than using alginate and I just find it easier to use.
Before starting the life casting make sure Vaseline applied to all areas with hair on them, for example on the face put Vaseline on the eyebrows, the eyelashes, any facial hair and any bits of your hair on your head that wont be covered by cling film. Cling film is the quickest way to block out hair on your head.
When using alginate, it is best to start by putting a pea size bit up each nostril and then squeezing the, out. This ensures that as much of the nose can be cast as possible without covering the nostrils. It is also best if you line where the lips touch together with it as this ensures it picks up the detail and the shape of the lips correctly. It is also important to make sure the water you use in the alginate isn't too cold as this can send he person into shock and make them panic, but you don't want the water to be too hot so the alginate sets super quick. Its always best to make sure your model is always feeling ok while doing the life casting, so simple hand gestures should be in place for them to do to say if they are ok and for when they aren't ok, also keep asking them if they are feeling alright. When the cast is done with alginate it is important to back the cast with modroc to make it stiffer so that you can pour a mixture into it without it bending out of shape or breaking.
Creating the positive cast:
From the life cast you make a positive cast, this is the part that you can actually sculpt onto. This is mainly done with a plaster, a fiberglass or a polyurethane. I do my casts in plaster. Make sure you buy good quality plaster because if you don't it could just fall apart while your sculpting onto it.
Basically all you do is mix the substance, and pour it into the mould and wait for it to dry then when you remove it you have a perfect cast.
Sculpting:
Sculpting is the most fun part of the process because its all about imagination. I personally sculpt with air drying clay. For sculpting it is important to have a range of sculpting tools and sponges. I have a metal set of different sculpting tools, various different textures sponges and I also use toothbrushes and paintbrushes to create texture.
Make sure the edges of the sculpt are smooth and as thin as possible as this helps the final product blend into the skin better.
Making a cast of the sculpt:
Making a cast of the sculpt is the hardest part to explain, but basically you are doing what you did to your life model, to the sculpted piece. You can use a silicone, or alginate but I choose to use plaster that is of a thicker consistency and again back it with modroc. Since wet plaster doesn't stick to dry plaster this works perfectly fine aslong as you use a releasing agent like Vaseline. Another way you can do this is put a wall of clay around the sculpt and pour in plaster. When you take the two pieces apart and remove the clay from the mould, you are left with a positive cast of the face and a negative cast of the sculpted piece. Make sure these two parts are clean before proceeding.
Making the prosthetic:
Prosthetics can be made out of a range of materials from silicones, to gelatine but I prefer to make mine out of latex as it is a cheaper alternative. Latex may not be the best material but it does the job.
When making the prosthetic, pour whatever substance you decide to use into the negative mould of the sculpt. The positive cast of the face should then be placed back into the other half, allowing any excess latex or silicone to come out of the mould. Doing this ensures that the prosthetic actually fits the models face correctly.
Once it is all dry, make sure you carefully separate the two halves, and remove the prosthetic carefully using talc powder to help remove it from the mould.
Wednesday, 8 April 2015
severed hand and finger
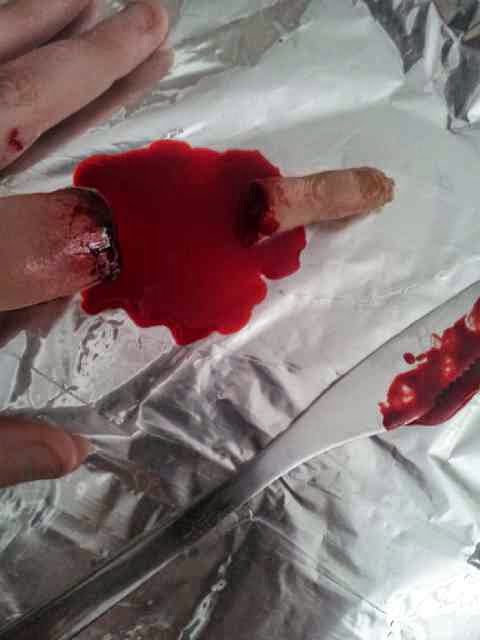
This is a blog on some of the recent makeup things that I have done using sculpt gel. I am starting to make tutorials, so I did one of the severed finger which I will be posting on youtube and will have a link on this post very soon.
Severed hand:
This was a really fun sfx makeup to do, it was quite easy to do aswell. I watched a tutorial by goldiestarling on youtube a few days before trying this makeup so I took inspiration from there. In her video she puts thread over it to make it look stitched on but I didn't have any thread handy at the time.
Goldiestarlings tutorial: https://www.youtube.com/watch?v=GZnkuuMxQTI
Severed finger:
This makeup has been done on tutorials many times, but I used sculpt gel which I haven't seen anybody use yet so I decided to film this to make it into a tutorial. The pictures below are of the wound I created and I also used a fake finger that I made using latex to make the picture look more real as if id cut off my finger.
Wednesday, 1 April 2015
Newcastle Film and Comic Con 2015
This year at Newcastle comic con I went as a gentleman from buffy, and also dressed a friend up as a vampire from buffy.
Genderbend Gentlemen:
My makeup was all done with face paint and I was very happy with the outcome. I took inspiration off a video from pinkstylist which I will put below, but I did it with a twist of a gender bend:
https://www.youtube.com/watch?v=ZF0qvPFuKvg

The first picture is the first attempt I had at doing the makeup. I feet like this one looks different to the one I did on the day but I think the one I did on the day looks better. I was happy with how this turned out however it isn't the full look.
This photo was took before I put the contacts in for the actual comic con. The lighting made the face look yellow but its not. I added contouring to the neck and also back tatted my hair back, and put white and black hairspray in it to make it look old and tatty. This made it look good and showed that it was a gender bend of the character.

This photo is the finished look completed with contacts and the suit. I got the contacts from the magic box in Newcastle for £8 pounds I think. The suit was just some stuff I had already. I really liked how the finished look turned out! Also since it was a genderbend I wore a skirt.
This last picture is just to show off really! I met James Marsters on the day and he complemented mine and my friends makeup that I did! yay!

Vampire Makeup
This photo is of the vampire makeup I did for my friend for Newcastle comic con! I made a prosthetic appliance to create the 'angry' eyebrow look and stuck it on with mastix. I then sealed the edges with liquid latex to make them smoother and then painted the face and prosthetic a matching colour. I then contoured the cheekbones and shaded in the areas like the eyes and the forehead to show depth then the look was finished off by adding yellow contacts!

Genderbend Gentlemen:
My makeup was all done with face paint and I was very happy with the outcome. I took inspiration off a video from pinkstylist which I will put below, but I did it with a twist of a gender bend:
https://www.youtube.com/watch?v=ZF0qvPFuKvg
The first picture is the first attempt I had at doing the makeup. I feet like this one looks different to the one I did on the day but I think the one I did on the day looks better. I was happy with how this turned out however it isn't the full look.

This photo was took before I put the contacts in for the actual comic con. The lighting made the face look yellow but its not. I added contouring to the neck and also back tatted my hair back, and put white and black hairspray in it to make it look old and tatty. This made it look good and showed that it was a gender bend of the character.

This photo is the finished look completed with contacts and the suit. I got the contacts from the magic box in Newcastle for £8 pounds I think. The suit was just some stuff I had already. I really liked how the finished look turned out! Also since it was a genderbend I wore a skirt.
This last picture is just to show off really! I met James Marsters on the day and he complemented mine and my friends makeup that I did! yay!
Vampire Makeup
This photo is of the vampire makeup I did for my friend for Newcastle comic con! I made a prosthetic appliance to create the 'angry' eyebrow look and stuck it on with mastix. I then sealed the edges with liquid latex to make them smoother and then painted the face and prosthetic a matching colour. I then contoured the cheekbones and shaded in the areas like the eyes and the forehead to show depth then the look was finished off by adding yellow contacts!
The two completed looks!
Tuesday, 31 March 2015
Being a costume assistant for a faux sitcom tv pilot
I had the opportunity of being a costume assistant on 'a madman in a life boat' by matt stokes.
This is a part of the press information about it on his website:
'Matt Stokes’ new Matt’s Gallery commission Madman in a Lifeboat is an immersive, sculptural video installation, built around the pilot episode of a faux situational comedy series.
The exhibition is based on the surreal imaginings of 74-year-old East Londoner, Charlie Seber, and investigates his life’s work developing a movement called Truth, Reality, Activism – created by Seber following an epiphany whilst working on East End building sites during the 1980’s'
http://www.mattsgallery.org/artists/stokes/exhibition-2.php
This was amazing work experience because it was fun, and I also got the chance to go on set while they were filming to see the effort that goes into it. I was with the makeup artist of the show so got to see what she did through the filming and it gave me a better understanding of the job.
These are just a few pictures of the costumes that we helped with, and also a few pictures from on set:
The costumes included a Heart, Cigarettes, An alien Galileo, and Earwigs.
The pics below are from location, The potato is a puppet:
Thursday, 19 March 2015
BGFX company
This company is a southeast London based SFX makeup company that was founded in 2010 my husband and wife, Barrie and Sarah Gower.
They offer high quality photo realistic character effects for TV and film. They offer character concept design to prosthetics and you can contact them to help you if you have a project you are working on and need a quote of a price for their work.
Their website is very useful as it gives you a lot of information about all the projects they have worked on and also gives you pictures to look at. It also has their contact details on there which is useful for asking for work experience etc.
Contact details:
e: info@bgfx.co.uk
t: +44 (0) 1322 837 797
m: +44 (0) 7976 369 030
Website: http://www.bgfx.co.uk/
Facebook: https://www.facebook.com/pages/BGFX-Ltd/114508798664415?sk=wall
Linkedln: http://uk.linkedin.com/pub/barrie-gower/24/16/225
Youtube: https://www.youtube.com/user/BarrieGower
IMDB: http://www.imdb.com/name/nm0332968/
BGFX have been awarded 66 primetime Emmy awards for their work and their latest one was an award for outstanding prosthetic makeup for game of thrones season 4.
The people behind it:
Barrie Gower - Creative director
Barrie started his journey into the film industry when he did a degree at London college of fashion and graduated with a HND in specialist makeup techniques. His first job was in 1966 when he graduated, it was with the BBC working in the visual effects department working on red dwarf and silent witness. A year after this, he was hired for his first major film called saving private Ryan by Steven Spielberg.
From there he has went to work with award winning companies such as Weta Workshop and individuals such as Rick Baker. He directs all creative effects that go on in projects that BGFX work on.
Sarah Gower (Maiden name - Sarah Micallef) - Project co-ordinator
Sarah starting her journey in Teeseide university and graduated with a BA (Hons) in Creative Visualisation in 2000. Her first work was with the visual effects department of Jim Hendersons creature shop. After this her career progressed into VFX and she worked for Framestore as VFX coordinator and DI producer. She also worked as a VFX coordinator for Disney/Bruckheimer on prince of Persia and she has recently worked as a VFX producer at Cinesite on films such as X-men first class. With these skills she is now coordinator of all projects that BGFX work on.
Credits:
Feature Films:
Tarzan
Absolutely Anything
Jupiter Ascending
Noble
Dom Hemingway
The World's End
Diana
How I live now
Rush
Life of Pi
Snow White & The Huntsman
The Iron Lady
The Grey
Wrath of the Titans
Dark Shadows
47 Ronin
Unknown
Burke & Hare
Kick-Ass
The Wolfman
The Nutcracker
The Dark Knight
Stardust
Hannibal Rising
Perfume
Last King of Scotland
Harry Potter 2, 3 & 4
(The Deathly Hallows 1 & 2)
Star Wars: Episode II
Shaune of the Dead
AVP: Alien vs. Predator
Troy
28 Days Later
Blade II
Resident Evil
Gladiator
Saving Private Ryan
Television:
Game of Thrones: Season V
Game of Thrones: Season IV
Mr. Sloane
The Widower
Fit
Episodes, series 2
Beautiful People
Ashes to Ashes
Silent Witness
Red Dwarf: Back to Earth
Spooks
Merlin
Cranford
Saxondale
Little Miss Jocelyn 1 & 2
ShakespeaRe-Told
Dr. Who
Ruddy Hell! It's Harry and Paul
Little Britain
Messiah 4
Walking with Cavemen
Band of Brothers
Jason and the Argonauts
Animal Farm
Alice in Wonderland
Below are a few pictures from their website showing some of the progression included in making a prosthetic piece:
Harry potter and the prisoner of Azkaban


This is a sculpted 'Football head' for the actor Martin Freeman. In the film his head was smashed and replaced with a ball. It consisted of 3 overlapping silicone appliances and a lightweight polyurethane ball that was made to fir the actors head. Other people involved in this project were Brian Best, Nikkie Grimshaw and Waldo Mason.
Stardust


This is several stages of ageing makeup done for the actress Michelle Pfeiffer as the witch characters Lamia. Other people involved were Nik Williams, Stuart Bray and Duncan Jarman.
They offer high quality photo realistic character effects for TV and film. They offer character concept design to prosthetics and you can contact them to help you if you have a project you are working on and need a quote of a price for their work.
Their website is very useful as it gives you a lot of information about all the projects they have worked on and also gives you pictures to look at. It also has their contact details on there which is useful for asking for work experience etc.
Contact details:
e: info@bgfx.co.uk
t: +44 (0) 1322 837 797
m: +44 (0) 7976 369 030
Website: http://www.bgfx.co.uk/
Facebook: https://www.facebook.com/pages/BGFX-Ltd/114508798664415?sk=wall
Linkedln: http://uk.linkedin.com/pub/barrie-gower/24/16/225
Youtube: https://www.youtube.com/user/BarrieGower
IMDB: http://www.imdb.com/name/nm0332968/
BGFX have been awarded 66 primetime Emmy awards for their work and their latest one was an award for outstanding prosthetic makeup for game of thrones season 4.
The people behind it:
Barrie Gower - Creative director
Barrie started his journey into the film industry when he did a degree at London college of fashion and graduated with a HND in specialist makeup techniques. His first job was in 1966 when he graduated, it was with the BBC working in the visual effects department working on red dwarf and silent witness. A year after this, he was hired for his first major film called saving private Ryan by Steven Spielberg.
From there he has went to work with award winning companies such as Weta Workshop and individuals such as Rick Baker. He directs all creative effects that go on in projects that BGFX work on.
Sarah Gower (Maiden name - Sarah Micallef) - Project co-ordinator
Sarah starting her journey in Teeseide university and graduated with a BA (Hons) in Creative Visualisation in 2000. Her first work was with the visual effects department of Jim Hendersons creature shop. After this her career progressed into VFX and she worked for Framestore as VFX coordinator and DI producer. She also worked as a VFX coordinator for Disney/Bruckheimer on prince of Persia and she has recently worked as a VFX producer at Cinesite on films such as X-men first class. With these skills she is now coordinator of all projects that BGFX work on.
Credits:
Feature Films:
Tarzan
Absolutely Anything
Jupiter Ascending
Noble
Dom Hemingway
The World's End
Diana
How I live now
Rush
Life of Pi
Snow White & The Huntsman
The Iron Lady
The Grey
Wrath of the Titans
Dark Shadows
47 Ronin
Unknown
Burke & Hare
Kick-Ass
The Wolfman
The Nutcracker
The Dark Knight
Stardust
Hannibal Rising
Perfume
Last King of Scotland
Harry Potter 2, 3 & 4
(The Deathly Hallows 1 & 2)
Star Wars: Episode II
Shaune of the Dead
AVP: Alien vs. Predator
Troy
28 Days Later
Blade II
Resident Evil
Gladiator
Saving Private Ryan
Television:
Game of Thrones: Season V
Game of Thrones: Season IV
Mr. Sloane
The Widower
Fit
Episodes, series 2
Beautiful People
Ashes to Ashes
Silent Witness
Red Dwarf: Back to Earth
Spooks
Merlin
Cranford
Saxondale
Little Miss Jocelyn 1 & 2
ShakespeaRe-Told
Dr. Who
Ruddy Hell! It's Harry and Paul
Little Britain
Messiah 4
Walking with Cavemen
Band of Brothers
Jason and the Argonauts
Animal Farm
Alice in Wonderland
Below are a few pictures from their website showing some of the progression included in making a prosthetic piece:
Harry potter and the prisoner of Azkaban
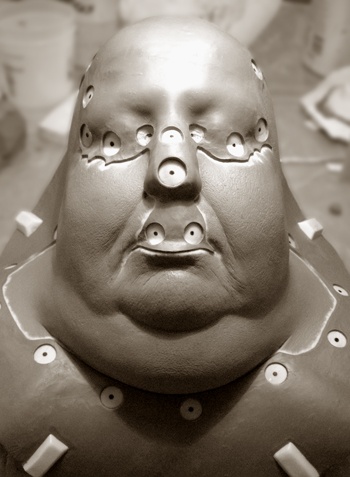
This is a prosthetic for aunt marge played by pam ferris, they had to make two different ones, one to fit the actress and one to fit her stunt double. It consisted of several layers of foam layers.
The worlds end
Stardust
This is several stages of ageing makeup done for the actress Michelle Pfeiffer as the witch characters Lamia. Other people involved were Nik Williams, Stuart Bray and Duncan Jarman.
Wednesday, 18 March 2015
My makeup kit so far
There are a lot of expensive materials you can get, but you can create some pretty decent effects with the basics like liquid latex, tissue/cotton wool and basic face makeup or paints. It is always useful to have concealers, foundations, eye shadows etc. on hand as they can come in very useful. This is how I started off but since I have started getting more into I have started to build up my kit with better products. I started off with liquid latex, which is really cheap stuff and you can get it off amazon and ebay and in Halloween shops but you can use it for anything, but make sure you get the one that is suitable for faces.
The next thing I got was a kit by mehron for £109 pound off amazon.co.uk (sometimes it is £99 pound). This kit includes a lot of essential stuff. This a great start to a kit, but some products you get are really small bottles of the stuff.
Whats in the kit:
Link to kit: http://www.amazon.co.uk/Mehron-Special-All-pro-Makeup-Kit/dp/B00GS8GJ6C/ref=sr_1_7?ie=UTF8&qid=1426725570&sr=8-7&keywords=mehron
I have also just ordered some more products. I ordered sculpt gel and also the bloody marvellous starter kit for wound fillers, these products were expensive but they are amazing to work with. I think good products are always worth the expense if you are serious about makeup. I bought both these products off ebay although there are different websites you can buy them from.
I also bought a snazaroo facepaint starter kit as I want to start practising with facepaint. you get 6 colours and a few other things for £24 off amazon which is amazing value as snazaroo facepaint pots on their own are about £3/£4 pound each. I also bought the wolfe FX essentials paint pallete to get a range of colours, and I've heard they are very good to use. They are just grease based paints but for now they will do the job as alcohol activated paints tend to be much more expensive. The wolfe FX one cost me £25 which is reasonable. I do tend to look on sites like ebay and amazon just because you can always find a deal, but there are may other websites you can buy these products from. Below are some links to the products that I bought.
Bloody marvellous kit: http://www.ebay.co.uk/itm/251866922027?_trksid=p2059210.m2749.l2649&ssPageName=STRK%3AMEBIDX%3AIT
Skin Sculpt gel: http://www.ebay.co.uk/itm/221668540379?_trksid=p2059210.m2749.l2649&ssPageName=STRK%3AMEBIDX%3AIT
Snazaroo starter kit: http://www.amazon.co.uk/gp/product/B000Y17NNM?psc=1&redirect=true&ref_=oh_aui_detailpage_o00_s00
Wolfe FX palette: http://www.amazon.co.uk/gp/product/B00886E6RG?psc=1&redirect=true&ref_=oh_aui_detailpage_o00_s00
I also bought a good makeup bag, and some makeup brushes. makeup brushes and things like cotton buds, lolly stick and tooth picks are all good products to have on hand. Plus the makeup bag helps keep everything together, eventually I want a holdall that I can wheel round for ease.
I also always have alginate and plaster of paris, modroc and clay on hand for casts because I have started doing prosthetic appliances. You can get all different kinds of alginate, fast setting and slow setting, so just do a bit of research before buying one as it might not be suitable for what your doing.
So all this above is what I have in my kit and I have only just started. I have spent a lot but im not finished yet!
The next thing I got was a kit by mehron for £109 pound off amazon.co.uk (sometimes it is £99 pound). This kit includes a lot of essential stuff. This a great start to a kit, but some products you get are really small bottles of the stuff.
Whats in the kit:
- 8 Color Palette Includes: 3 Mask Covers & 5 Color Cup Colors
- 4.5 oz. Liquid Latex Clear
- 1 oz. Squirt Blood
- Large Powder Puff
- 2 oz. 3-D Clear Gel
- Stage Blood
- 0.5 oz. Coagulated Blood
- 1 oz. Barrier Spray • Crepe Hair
- 3 Full Size Stageline Makeup Brushes
- Colorset Powder
- 1 oz. Makeup Remover Lotion
- 1 oz. Brush Cleaner
- 1 oz. Spirit Gum Remover
- Spirit Gum
- Tooth FX Blood Red
- Tooth FX Nicotine
- Rigid Collodion
- Fixative A
- 1 oz. Hair White
- Modeling Putty/Wax
- Extra Flesh
- Bruise ColorRing
- Stipple Sponge
- Non Latex Sponge
- Cotton Swabs
- 2 Prosthetic Bullet Holes and 1 Prosthetic Wound
- Application Guide - Special Effects
Link to kit: http://www.amazon.co.uk/Mehron-Special-All-pro-Makeup-Kit/dp/B00GS8GJ6C/ref=sr_1_7?ie=UTF8&qid=1426725570&sr=8-7&keywords=mehron
I have also just ordered some more products. I ordered sculpt gel and also the bloody marvellous starter kit for wound fillers, these products were expensive but they are amazing to work with. I think good products are always worth the expense if you are serious about makeup. I bought both these products off ebay although there are different websites you can buy them from.
I also bought a snazaroo facepaint starter kit as I want to start practising with facepaint. you get 6 colours and a few other things for £24 off amazon which is amazing value as snazaroo facepaint pots on their own are about £3/£4 pound each. I also bought the wolfe FX essentials paint pallete to get a range of colours, and I've heard they are very good to use. They are just grease based paints but for now they will do the job as alcohol activated paints tend to be much more expensive. The wolfe FX one cost me £25 which is reasonable. I do tend to look on sites like ebay and amazon just because you can always find a deal, but there are may other websites you can buy these products from. Below are some links to the products that I bought.
Bloody marvellous kit: http://www.ebay.co.uk/itm/251866922027?_trksid=p2059210.m2749.l2649&ssPageName=STRK%3AMEBIDX%3AIT
Skin Sculpt gel: http://www.ebay.co.uk/itm/221668540379?_trksid=p2059210.m2749.l2649&ssPageName=STRK%3AMEBIDX%3AIT
Snazaroo starter kit: http://www.amazon.co.uk/gp/product/B000Y17NNM?psc=1&redirect=true&ref_=oh_aui_detailpage_o00_s00
Wolfe FX palette: http://www.amazon.co.uk/gp/product/B00886E6RG?psc=1&redirect=true&ref_=oh_aui_detailpage_o00_s00
I also bought a good makeup bag, and some makeup brushes. makeup brushes and things like cotton buds, lolly stick and tooth picks are all good products to have on hand. Plus the makeup bag helps keep everything together, eventually I want a holdall that I can wheel round for ease.
I also always have alginate and plaster of paris, modroc and clay on hand for casts because I have started doing prosthetic appliances. You can get all different kinds of alginate, fast setting and slow setting, so just do a bit of research before buying one as it might not be suitable for what your doing.
So all this above is what I have in my kit and I have only just started. I have spent a lot but im not finished yet!
Train station in london
The Westminster station, London
This station was designed by Michael Hopkins in 1999. I didn't really like this station when I saw it on pictures, but there's something fascinating about it when your actually there inside it. I love the design and the metal, industrial look of it.
He designed the station for London Underground Ltd and it cost £80 million to make and is 25,000 m squared in total.
The pictures below are some that I took of different angles of the station:


Michael Hopkins has done many other projects for a range of areas. He has done architecture for education, Healthcare, Residential and Retail, plus much more.
This is a link to all the projects that he has done on his website:
Tuesday, 17 March 2015
First time using sculpt gel
I thought I would do a quick small post on the cut I did using sculpt gel. it was my first time working with this product and I have to say it is really easy to work with and gives amazing results. I also had the chance to se some wound gel bloods from the bloody marvellous collection and this pushed me to buy my own of these products.
The only problem with the flesh coloured sculpt gel is that it is super shiny, so when ordered some I got the clear one.
Below of some pictures of it:


The only problem with the flesh coloured sculpt gel is that it is super shiny, so when ordered some I got the clear one.
Below of some pictures of it:
Monday, 16 March 2015
More makeup tests!
These are some more sfx makeup tests that I've done on my self and other people.
The first makeup test is a graze on the face with a bruised eye. the model for this one is my sister.
I used extra flesh and a bruise wheel to create this effect.


This one is an acid burn on my hand. I did this with 3D gel just splatted around the centre of my hand.


This is another burn type of thing that I did on a friends hand. I used latex and tissue for this.


This is a deep cut that I did on a friends hand, this was my first try at using a product called extra flesh. this was the first time I used this product and I think it is quite easy to use.


This a quick makeup test for the movie I am working on, I have details on another blog post. its just done with 3D gel, with a cross carved into the middle.


This is a wart/boil that I tried with 3D gel, its just dripped onto the skin and layered up so that it is a solid lump.


The first makeup test is a graze on the face with a bruised eye. the model for this one is my sister.
I used extra flesh and a bruise wheel to create this effect.
This one is an acid burn on my hand. I did this with 3D gel just splatted around the centre of my hand.
This is another burn type of thing that I did on a friends hand. I used latex and tissue for this.
This is a deep cut that I did on a friends hand, this was my first try at using a product called extra flesh. this was the first time I used this product and I think it is quite easy to use.
This a quick makeup test for the movie I am working on, I have details on another blog post. its just done with 3D gel, with a cross carved into the middle.
This is a wart/boil that I tried with 3D gel, its just dripped onto the skin and layered up so that it is a solid lump.
Subscribe to:
Comments (Atom)