Wednesday, 12 August 2015
Friday, 17 April 2015
Survey
If i was to do my report again for my Introductory Professional Studies unit at CCAD hartlepool for BA (hons) production design for stage and screen, This would be the survey i would post out to Makeup artists in the UK. I didn't think about doing a survey for my report until last minute, so i got no responses as i sent it out 4 days before the deadline.
Surveys give a more valid and bigger response to questions for reports and create a more valid argument. They also show a range of results which can be discussed to make a report more interesting.
working freelance
I decided to do this post as freelance is the route I quite want to go down. This is just a very quick post on this topic.
Freelance is basically working for yourself and getting commissioned to do work for people. This route can be quite hard but is appealing as you are your own boss and get hired by others to do work for them. Freelance work can start off slow with some jobs paying little or nothing but once you get recognised and get a foot in the door as they say, some jobs might be quite well paid and lead onto bigger things. The downside with freelance is that the money you bring in can differ and depends on the jobs you are tasked with.
The links below are some articles I found on a day in the life of a freelance makeup artist:
http://www.theguardian.com/money/2012/jun/22/working-life-make-up-artist
http://www.adventuresofacarryon.com/2013/02/07/a-day-in-the-life-of-a-freelance-makeup-artist/
finding work while free lancing:
Promoting is the biggest way to get work as a freelance makeup artist. Having a website, or making accounts on things like twitter, Facebook and YouTube allow you to put contact details and promote your work to a wide range of different people. This may lead to opportunities in work as someone may stumble across your work and you may be exactly what they are looking for.
Another thing is to keep looking on sites that advertise creative jobs, like stagejobspro.com. This website lists a whole host of different jobs in theatres, and sometimes it has makeup jobs. There are a lot more websites such as starnow.co.uk, and even job sites like indeed may have something advertised in this sector.
Thursday, 16 April 2015
The process of creating prosthetics
I have started looking into the process of making prosthetic appliances. This is a quick post showing the different steps in making prosthetics.
These are some links I have found useful while learning how to make prosthetics:
http://www.ps-composites.com/blog/HOW-TO-MAKE-PROSTHETICS/
Any of the videos of the next link are amazing at teaching you how to make these appliances:
https://www.youtube.com/results?search_query=how+to+make+prosthetics
Any of the videos of this next link are amazing at showing you how to sculpt different textures and shapes for prosthetics:
https://www.youtube.com/results?search_query=how+to+sculpt+a+prosthetic
Any of the videos on the next link are amazing at showing you how to life cast:
https://www.youtube.com/results?search_query=how+to+life+cast
I find videos easier to understand and learn from than articles and written instructions so that's why I have put links to so many videos.
Life casting:
Life casting involves casting someone's body part depending on where you want the prosthetic to be, this makes a base onto which you can sculpt the prosthetic piece onto. You can life cast with alginate, Although there are other casting materials available. For my recent face cast I used Modroc (plaster bandage), as this method is cheaper than using alginate and I just find it easier to use.
Before starting the life casting make sure Vaseline applied to all areas with hair on them, for example on the face put Vaseline on the eyebrows, the eyelashes, any facial hair and any bits of your hair on your head that wont be covered by cling film. Cling film is the quickest way to block out hair on your head.
When using alginate, it is best to start by putting a pea size bit up each nostril and then squeezing the, out. This ensures that as much of the nose can be cast as possible without covering the nostrils. It is also best if you line where the lips touch together with it as this ensures it picks up the detail and the shape of the lips correctly. It is also important to make sure the water you use in the alginate isn't too cold as this can send he person into shock and make them panic, but you don't want the water to be too hot so the alginate sets super quick. Its always best to make sure your model is always feeling ok while doing the life casting, so simple hand gestures should be in place for them to do to say if they are ok and for when they aren't ok, also keep asking them if they are feeling alright. When the cast is done with alginate it is important to back the cast with modroc to make it stiffer so that you can pour a mixture into it without it bending out of shape or breaking.
Creating the positive cast:
From the life cast you make a positive cast, this is the part that you can actually sculpt onto. This is mainly done with a plaster, a fiberglass or a polyurethane. I do my casts in plaster. Make sure you buy good quality plaster because if you don't it could just fall apart while your sculpting onto it.
Basically all you do is mix the substance, and pour it into the mould and wait for it to dry then when you remove it you have a perfect cast.
Sculpting:
Sculpting is the most fun part of the process because its all about imagination. I personally sculpt with air drying clay. For sculpting it is important to have a range of sculpting tools and sponges. I have a metal set of different sculpting tools, various different textures sponges and I also use toothbrushes and paintbrushes to create texture.
Make sure the edges of the sculpt are smooth and as thin as possible as this helps the final product blend into the skin better.
Making a cast of the sculpt:
Making a cast of the sculpt is the hardest part to explain, but basically you are doing what you did to your life model, to the sculpted piece. You can use a silicone, or alginate but I choose to use plaster that is of a thicker consistency and again back it with modroc. Since wet plaster doesn't stick to dry plaster this works perfectly fine aslong as you use a releasing agent like Vaseline. Another way you can do this is put a wall of clay around the sculpt and pour in plaster. When you take the two pieces apart and remove the clay from the mould, you are left with a positive cast of the face and a negative cast of the sculpted piece. Make sure these two parts are clean before proceeding.
Making the prosthetic:
Prosthetics can be made out of a range of materials from silicones, to gelatine but I prefer to make mine out of latex as it is a cheaper alternative. Latex may not be the best material but it does the job.
When making the prosthetic, pour whatever substance you decide to use into the negative mould of the sculpt. The positive cast of the face should then be placed back into the other half, allowing any excess latex or silicone to come out of the mould. Doing this ensures that the prosthetic actually fits the models face correctly.
Once it is all dry, make sure you carefully separate the two halves, and remove the prosthetic carefully using talc powder to help remove it from the mould.
Wednesday, 8 April 2015
severed hand and finger
This is a blog on some of the recent makeup things that I have done using sculpt gel. I am starting to make tutorials, so I did one of the severed finger which I will be posting on youtube and will have a link on this post very soon.
Severed hand:
This was a really fun sfx makeup to do, it was quite easy to do aswell. I watched a tutorial by goldiestarling on youtube a few days before trying this makeup so I took inspiration from there. In her video she puts thread over it to make it look stitched on but I didn't have any thread handy at the time.
Goldiestarlings tutorial: https://www.youtube.com/watch?v=GZnkuuMxQTI
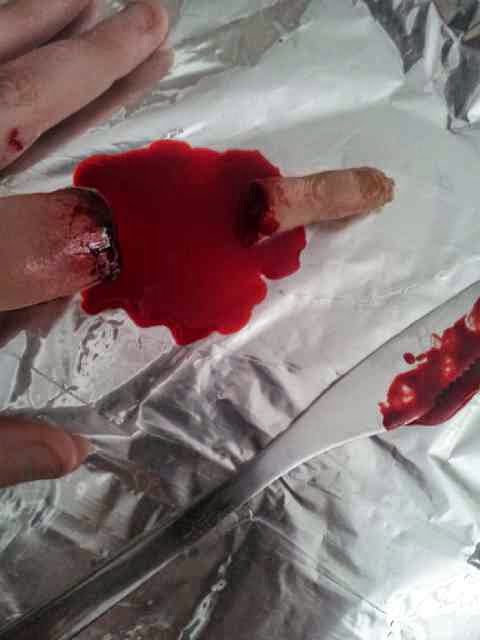
Severed finger:
This makeup has been done on tutorials many times, but I used sculpt gel which I haven't seen anybody use yet so I decided to film this to make it into a tutorial. The pictures below are of the wound I created and I also used a fake finger that I made using latex to make the picture look more real as if id cut off my finger.
Wednesday, 1 April 2015
Newcastle Film and Comic Con 2015
This year at Newcastle comic con I went as a gentleman from buffy, and also dressed a friend up as a vampire from buffy.
Genderbend Gentlemen:
My makeup was all done with face paint and I was very happy with the outcome. I took inspiration off a video from pinkstylist which I will put below, but I did it with a twist of a gender bend:
https://www.youtube.com/watch?v=ZF0qvPFuKvg

The first picture is the first attempt I had at doing the makeup. I feet like this one looks different to the one I did on the day but I think the one I did on the day looks better. I was happy with how this turned out however it isn't the full look.
This photo was took before I put the contacts in for the actual comic con. The lighting made the face look yellow but its not. I added contouring to the neck and also back tatted my hair back, and put white and black hairspray in it to make it look old and tatty. This made it look good and showed that it was a gender bend of the character.

This photo is the finished look completed with contacts and the suit. I got the contacts from the magic box in Newcastle for £8 pounds I think. The suit was just some stuff I had already. I really liked how the finished look turned out! Also since it was a genderbend I wore a skirt.
This last picture is just to show off really! I met James Marsters on the day and he complemented mine and my friends makeup that I did! yay!

Vampire Makeup
This photo is of the vampire makeup I did for my friend for Newcastle comic con! I made a prosthetic appliance to create the 'angry' eyebrow look and stuck it on with mastix. I then sealed the edges with liquid latex to make them smoother and then painted the face and prosthetic a matching colour. I then contoured the cheekbones and shaded in the areas like the eyes and the forehead to show depth then the look was finished off by adding yellow contacts!

Genderbend Gentlemen:
My makeup was all done with face paint and I was very happy with the outcome. I took inspiration off a video from pinkstylist which I will put below, but I did it with a twist of a gender bend:
https://www.youtube.com/watch?v=ZF0qvPFuKvg
The first picture is the first attempt I had at doing the makeup. I feet like this one looks different to the one I did on the day but I think the one I did on the day looks better. I was happy with how this turned out however it isn't the full look.

This photo was took before I put the contacts in for the actual comic con. The lighting made the face look yellow but its not. I added contouring to the neck and also back tatted my hair back, and put white and black hairspray in it to make it look old and tatty. This made it look good and showed that it was a gender bend of the character.

This photo is the finished look completed with contacts and the suit. I got the contacts from the magic box in Newcastle for £8 pounds I think. The suit was just some stuff I had already. I really liked how the finished look turned out! Also since it was a genderbend I wore a skirt.
This last picture is just to show off really! I met James Marsters on the day and he complemented mine and my friends makeup that I did! yay!
Vampire Makeup
This photo is of the vampire makeup I did for my friend for Newcastle comic con! I made a prosthetic appliance to create the 'angry' eyebrow look and stuck it on with mastix. I then sealed the edges with liquid latex to make them smoother and then painted the face and prosthetic a matching colour. I then contoured the cheekbones and shaded in the areas like the eyes and the forehead to show depth then the look was finished off by adding yellow contacts!
The two completed looks!
Tuesday, 31 March 2015
Being a costume assistant for a faux sitcom tv pilot
I had the opportunity of being a costume assistant on 'a madman in a life boat' by matt stokes.
This is a part of the press information about it on his website:
'Matt Stokes’ new Matt’s Gallery commission Madman in a Lifeboat is an immersive, sculptural video installation, built around the pilot episode of a faux situational comedy series.
The exhibition is based on the surreal imaginings of 74-year-old East Londoner, Charlie Seber, and investigates his life’s work developing a movement called Truth, Reality, Activism – created by Seber following an epiphany whilst working on East End building sites during the 1980’s'
http://www.mattsgallery.org/artists/stokes/exhibition-2.php
This was amazing work experience because it was fun, and I also got the chance to go on set while they were filming to see the effort that goes into it. I was with the makeup artist of the show so got to see what she did through the filming and it gave me a better understanding of the job.
These are just a few pictures of the costumes that we helped with, and also a few pictures from on set:
The costumes included a Heart, Cigarettes, An alien Galileo, and Earwigs.
The pics below are from location, The potato is a puppet:
Subscribe to:
Comments (Atom)